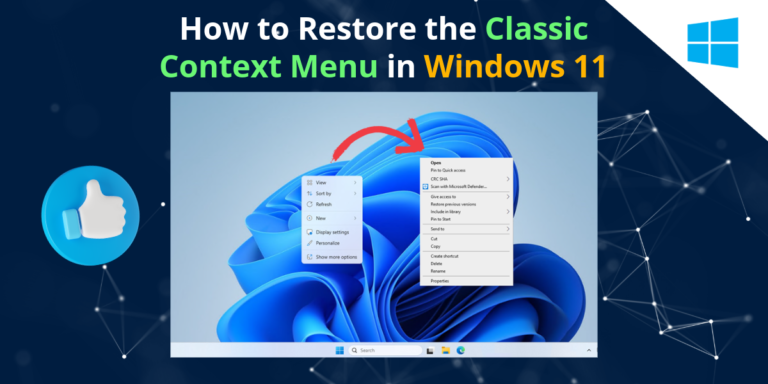
How to Restore the Classic Context Menu in Windows 11: A Step-by-Step Guide

How to Restore the Classic Context Menu in Windows 11 The context menu in Windows 11 has a sleeker and more modern design compared to previous versions. While some users appreciate the change, others find it less functional or slower for certain tasks. If you’re one of those who prefer the old-style context menu from Windows 10 or earlier, this guide will show you how to revert to the classic context menu in Windows 11. Why Restore the Classic Context Menu? Before we dive into the steps, it’s worth understanding why many users prefer the classic context menu: Step-by-Step Guide to Revert to the Classic Context Menu To get back the old context menu, you’ll need to make a small change to the Windows registry. Don’t worry if this sounds complicated – follow the steps below carefully, and you’ll be back to the classic layout in no time. Step 1: Open the Registry Editor Step 2: Navigate to the Correct Registry Path Once the Registry Editor is open, you need to navigate to a specific path: Step 3: Add a New Registry Key Step 4: Create a New Subkey Step 5: Modify the New Subkey Step 6: Restart Your Computer After modifying the registry, you’ll need to restart your computer for the changes to take effect. Once your computer reboots, you should now see the classic context menu when you right-click on your desktop or inside File Explorer. How to Revert Back to the Windows 11 Context Menu If you ever want to go back to the new context menu, simply reverse the changes: Alternative: Using a Third-Party Tool If editing the registry isn’t something you’re comfortable with, there are several third-party tools available that can automate the process for you. Tools like Winaero Tweaker allow you to customize the appearance and behavior of Windows 11, including restoring the classic context menu with just a few clicks. Final Thoughts The updated context menu in Windows 11 may look cleaner, but for those who prioritize functionality and speed, the classic menu can be a better fit. By following the simple steps above, you can quickly revert to the old-style menu and enjoy a more familiar Windows experience. Remember to always back up your registry before making any changes, and if you’re unsure about any steps, consider using third-party tools to simplify the process.

Read More »

How to Setup IMAP/POP3 Email on Windows Computer

Setting up your email on a Windows computer using IMAP or POP3 can streamline your communication, ensuring you can access your emails efficiently. Whether you prefer the synchronization capabilities of IMAP or the offline access provided by POP3, this guide will walk you through the necessary steps to configure your email client correctly. What are IMAP, POP3, and SMTP Protocols? Understanding the difference between IMAP, POP3, and SMTP is essential before diving into the setup process. What Port Numbers are Needed? Configuring your email requires knowing the correct port numbers: Prerequisites Before you begin, ensure you have the following: How to Setup IMAP/POP3 Email on Windows Computer Setup IMAP/POP3 Email on Windows Mail App Setting up your email using IMAP or POP3 on the Windows Mail app is a straightforward process that allows you to manage your emails efficiently. This guide will walk you through each step to configure your email account properly. Follow these steps to configure your email account: Setup IMAP/POP3 Email on Windows Outlook App Setting up your email using IMAP or POP3 on the Windows Outlook app is an essential task to ensure efficient email management. This guide provides a step-by-step process to configure your email account correctly in Outlook. Follow these steps to set up your email account: Setup IMAP/POP3 Email on Windows Thunderbird App Setting up your email using IMAP or POP3 on the Windows Thunderbird app ensures efficient email management. This guide provides a comprehensive step-by-step process to configure your email account correctly in Thunderbird. Follow these steps to set up your email account: Conclusion Setting up your email using IMAP or POP3 on the Windows Mail, Outlook or Thunderbird app is a straightforward process if you follow the correct steps and have the necessary information. By understanding the roles of IMAP, POP3, and SMTP, and using the appropriate port numbers, you can ensure a smooth configuration. With your email account set up correctly, you’ll be able to manage your emails efficiently on your Windows computer using Thunderbird. If you encounter any issues, refer to your email provider’s support resources or contact their customer service for additional assistance. Enjoy!

Read More »

Top 3 Tools to Customize Your Windows Taskbar

Top 3 Tools to Customize Your Windows Taskbar Your Windows taskbar is your gateway to efficient navigation and multitasking on your computer. While Windows offers a standard taskbar setup, you can elevate your user experience by customizing it to suit your preferences and needs. In this blog post, we’ll explore three top-notch tools that allow you to personalize and enhance your Windows taskbar. Whether you’re a Windows 10 or 11 user, these tools are sure to take your desktop customization to the next level. StartAllBack StartAllBack is a powerful tool designed to bring the classic Windows 7 Start Menu experience to your Windows 10 or 11 taskbar. With StartAllBack, you can regain familiar features and functionalities, such as the traditional Start Menu layout and customization options. This tool seamlessly integrates into your system, providing a smooth and efficient way to access your favorite apps, files, and settings. Whether you miss the simplicity of older Windows versions or crave enhanced functionality, StartAllBack is a must-have customization tool for your taskbar. NiceTaskbar NiceTaskbar is a versatile taskbar customization tool that offers a range of features to enhance your Windows experience. From color customization to advanced taskbar management options, NiceTaskbar empowers you to tailor your taskbar according to your preferences. With its intuitive interface and user-friendly design, NiceTaskbar makes it easy to personalize your desktop and streamline your workflow. Whether you’re a casual user or a power user, NiceTaskbar provides the tools you need to make your taskbar truly your own. TranslucentTB TranslucentTB is a lightweight and customizable tool that allows you to add transparency effects to your Windows taskbar. With TranslucentTB, you can create a sleek and modern look for your desktop while maintaining full functionality of the taskbar. This tool offers various customization options, including transparency level, color settings, and taskbar icon management. Whether you prefer a subtle transparency effect or a more pronounced aesthetic, TranslucentTB gives you the flexibility to tailor your taskbar to your liking. Best of all, TranslucentTB is completely free to use, making it a top choice for users seeking both style and functionality. Conclusion Customizing your Windows taskbar not only adds a personal touch to your desktop but also enhances your overall user experience. With the right tools, such as StartAllBack, NiceTaskbar, and TranslucentTB, you can transform your taskbar into a powerful productivity hub that reflects your unique style and preferences. Whether you prefer classic functionality, advanced customization options, or modern aesthetics, these tools have you covered. So why settle for the default taskbar when you can customize it to suit your needs? Try out these top tools today and take your Windows experience to new heights!

Read More »

Top 5 Websites to Download Stunning Windows Themes for Free

Are you looking to give your Windows desktop a fresh, personalized look? Downloading and installing a new theme can transform your computer experience. Here are the top 5 websites where you can download stunning Windows themes for free. We’ve also included a handy guide on how to install these themes and a conclusion summarizing the benefits of customizing your desktop. 1. Microsoft Store The Microsoft Store is the official source for Windows themes. It offers a wide range of themes, from serene landscapes to dynamic cityscapes, all optimized for Windows 10 and 11. The themes are free and easy to install directly from the store. 2. DeviantArt DeviantArt is a community of artists where you can find unique and creative Windows themes. The site offers an extensive collection of themes designed by talented artists, ensuring a variety of styles and aesthetics. Be sure to read the installation instructions provided by the theme creators. 3. ThemePack.me ThemePack.me is dedicated to Windows themes and provides a vast selection of high-quality themes for free. The website is user-friendly, with themes categorized by genre, making it easy to find the perfect one for your desktop. 4. ThemeBeta ThemeBeta is a well-known site for Google Chrome themes, but it also offers a variety of Windows themes. The site allows users to create and share their themes, providing a unique and personalized experience for Windows users. 5. SkinPack SkinPack offers both free and premium Windows themes. The site features themes that can completely overhaul the look of your desktop, giving you a new visual experience. Be sure to check the compatibility of the theme with your version of Windows before downloading. How to Install a Windows Theme Installing a Windows theme is a straightforward process. Follow these steps to give your desktop a new look: Conclusion Customizing your Windows desktop with a new theme can make your computer more enjoyable to use and reflect your personal style. The websites listed above offer a variety of stunning themes for free, allowing you to transform your desktop with just a few clicks. Whether you prefer minimalist designs, vibrant colors, or intricate art, there’s a theme out there for you. Download a new theme today and give your Windows desktop a fresh look!

Read More »

Snipping Tool | The Complete Easy Guide

What is Snipping Tool? The Snipping Tool is a built-in screenshot utility in Windows operating systems that allows users to capture various types of screenshots. Whether you need to snip a specific portion of your screen, an open window, or the entire screen, the Snipping Tool provides a quick and easy way to do so. Features of Snipping Tool: Why is Snipping Tool Better Than Third-Party Apps? While there are numerous third-party screenshot tools available, the Snipping Tool offers several advantages: Additional Benefits: Step by Step: How to Use Snipping Tool Using the Snipping Tool is straightforward. Follow these steps to take your first screenshot: Pro Tips: Conclusion The Snipping Tool is an essential utility for anyone using a Windows operating system. Its ease of use, built-in availability, and robust feature set make it an ideal choice for capturing screenshots without the need for third-party applications. Whether you’re a casual user or a professional, mastering the Snipping Tool can enhance your productivity and streamline your workflow.

Read More »

How create a bootable USB drive for Windows 10 / 11 | Step by step

How create a bootable USB drive for Windows 10 / 11 In the realm of tech troubleshooting and installations, having a bootable USB drive for Windows 10/11 is akin to having a Swiss army knife in your digital toolkit. It’s a lifesaver for situations like system repairs, installations, or upgrades. Let’s dive into the ins and outs of creating one. What is a Windows Bootable USB Drive or Windows Installation Media? A Windows Bootable USB Drive, also known as Windows Installation Media, is a portable storage device that contains the necessary files and setup to boot a computer directly into the Windows operating system. It essentially serves as an alternative to booting from the computer’s internal hard drive. This USB drive holds an exact copy of the Windows installation files and can be used for various purposes such as installing or repairing Windows, upgrading the operating system, or troubleshooting system issues. In essence, a Windows bootable USB drive allows users to initiate the Windows setup process without relying on the computer’s internal storage. This flexibility is particularly useful in situations where the internal storage is inaccessible due to corruption or malfunction, or when performing clean installations on multiple computers without the need for optical media like DVDs. When/Why Do You Need to Use a Windows Bootable USB Drive? Prerequisites Before Creating a Bootable USB Drive for Windows 10/11: Before diving into the creation process, ensure you have the following: How to Create a Bootable USB Drive for Windows 10/11: Using Microsoft Media Creation Tool (Step by Step): Using RUFUS (Step by Step): Note: Before proceeding with this step, you need to download the Windows 10/11 .iso file and to do so, you can use the Window Media Creation Tool. Conclusion: Creating a bootable USB drive (Windows Installation Media) for Windows 10/11 is a straightforward process that can come in handy in various scenarios, from system repairs to fresh installations. Whether you opt for the user-friendly Microsoft Media Creation Tool or the robust RUFUS software, having a bootable USB drive ensures you’re prepared for any Windows-related emergencies.

Read More »

Step-by-Step Guide: How to Reset a Forgotten Password in Windows 10 or Windows 11

Forgetting your Windows password can be frustrating, but fear not – there are several methods to regain access to your computer. Whether you’re using Windows 10 or the latest Windows 11, this step-by-step guide will walk you through various techniques to reset a forgotten password and get back into your system. How to Reset a Forgotten Password in Windows 10 or Windows 11 Password Reset Disk: Microsoft Account: Safe Mode: Command Prompt: Third-Party Tools: Conclusion: Forgetting your Windows password doesn’t have to be a nightmare. By following these step-by-step methods, you can regain access to your computer and resume your work without losing precious time. Whether you opt for a password reset disk, your Microsoft account, Safe Mode, Command Prompt, or third-party tools, there’s a solution for every situation. So, the next time you find yourself locked out of your Windows system, remember this guide and get back to using your computer hassle-free.

Read More »

8 Main Steps to Maintain Your Windows 10 / 11 Computer for Peak Performance

Maintaining your Windows computer is essential for ensuring optimal performance, security, and longevity. In this comprehensive guide, we’ll walk you through step-by-step instructions on how to implement the 8 main steps in maintain your Windows 10 / 11 computer for peak performance and running smoothly. 8 Main Steps to Maintain Your Windows 10 / 11 Computer: Discover the 8 main steps to effectively maintain your Windows 10 / 11 computer for optimal performance and longevity. Learn how to safeguard your system against common issues, boost speed, and enhance security, all while saving your hard-earned money by mastering do-it-yourself maintenance techniques. With our comprehensive guide, you’ll gain the knowledge and confidence to tackle computer upkeep like a pro, ensuring a smooth and efficient user experience every step of the way. Regular Software Updates In Windows 10: In Windows 11: System File Check, Check Disk and DISM Commands System File Check (SFC) Check Disk (CHKDSK) Note: Remember that running CHKDSK with the /f parameter will fix errors it finds on the disk. If you want CHKDSK to also locate and recover bad sectors, you can use the /r parameter instead, like this: chkdsk /r. However, running CHKDSK with the /r parameter can take significantly longer than running it with just the /f parameter. Microsoft Windows Deployment Image Servicing and Management (DISM) Note: DISM is particularly useful for repairing the Windows image when the System File Checker (SFC) tool cannot repair corrupted or missing system files. It’s a powerful tool for maintaining the health of your Windows installation. Disk Cleanup In Windows 10: In Windows 11: Manage Startup Programs Perform Disk Defragmentation Note: Do not proceed with this step if you storage drive is HDD, only proceed if it is SSD. Malware Protection Tip: There is an embedded software in Windows Operating System you can, it is called “Microsoft Windows Malicious Software Removal Tool”. Clean Temporary Files Update Drivers Manage Power Settings In Windows 10: In Windows 11: Monitor System Health Check for Hardware Issues Conclusion Regularly checking for hardware issues is crucial for maintaining the overall health and performance of your Windows 10 and Windows 11 computers. By following these detailed steps, you can identify and address potential hardware problems before they escalate and affect your system’s functionality.

Read More »

WinDirStat: A Comprehensive Guide to Streamlining Your Disk Space

WinDirStat: A Comprehensive Guide to Streamlining Your Disk Space In the labyrinth of digital storage, where every file and folder seems to have a life of its own, maintaining order can feel like an endless quest. As our digital footprints expand, so too does the clutter that accumulates on our hard drives, slowing down performance and sapping productivity. But fear not, for in this digital age, there exists a shining beacon of organization: WinDirStat. What is WinDirStat? WinDirStat, short for Windows Directory Statistics, is a powerful and intuitive disk usage statistics viewer and cleanup tool for Microsoft Windows. It presents disk usage in a colorful and interactive graphical interface, making it easy to identify which files and folders are consuming the most space on your hard drive. Visualizing Your Disk Space Upon launching WinDirStat, users are greeted with a visual representation of their disk space in the form of a treemap. Each colored rectangle in the treemap represents a file or directory, with larger rectangles indicating larger files or directories. The color coding helps users quickly identify different types of files based on their extensions. Drilling Down into Details WinDirStat doesn’t just stop at providing a bird’s eye view of your disk space usage; it also allows users to drill down into specific directories to get more detailed information. By selecting a rectangle in the treemap or navigating through the directory tree, users can see exactly which files are taking up space and how much space each file occupies. This level of granularity empowers users to pinpoint and purge unnecessary files with surgical precision. File Cleanup Made Easy Armed with insights from WinDirStat, users can embark on a journey to reclaim lost disk space and restore order to their digital domains. Whether it’s clearing out old downloads, pruning bloated application data, or archiving seldom-used files, WinDirStat provides the tools needed to declutter with confidence. And with the ability to delete files directly from within the application, the cleanup process is as seamless as it is satisfying. Analyzing Disk Usage Over Time In addition to its real-time disk usage analysis, WinDirStat also offers a feature called “Compare” that allows users to compare the current state of their disk with a previous snapshot. This can be immensely helpful for tracking changes in disk usage over time and identifying trends that may require attention. Customization and Flexibility WinDirStat is not just a one-size-fits-all solution; it offers a range of customization options to suit individual preferences and needs. From adjusting color schemes to filtering certain file types, users can tailor the application to their liking and streamline their workflow accordingly. Download WinDirStat Today Ready to take control of your disk space and unleash the power of organization? Download WinDirStat today and start reclaiming valuable storage space on your Windows system. Conclusion In a world where digital clutter threatens to overwhelm us at every turn, WinDirStat stands as a beacon of hope, offering clarity amidst the chaos. With its intuitive interface, powerful features, and unwavering commitment to efficiency, WinDirStat empowers users to take control of their disk space and unleash the full potential of their digital environments. So why let clutter hold you back? Download WinDirStat today and embark on a journey towards a cleaner, more organized future.

Read More »

Common Windows Commands to Fix Your Computer Problems

Windows Commands to Fix Your Computer Problems Are you tired of wrestling with computer problems, only to find yourself drowning in a sea of complex solutions? Fear not! In this comprehensive guide, we’ll walk you through a collection of indispensable commands that will help you tackle common computer issues like a seasoned pro. From troubleshooting system errors to reclaiming precious disk space, these commands are your trusty companions in the digital realm. This article post equips you with a practical toolkit of essential commands to restore your computer’s optimal performance. As a best practice, it’s always recommended to create a backup of critical data before executing any unfamiliar commands. 1. CHKDSK (Check Disk) What is it?CHKDSK (Check Disk) is a Windows utility used to check the integrity of the file system and fix any logical file system errors on a disk. It scans the file system for errors caused by improper shutdowns, bad sectors, or other issues and attempts to repair them. When to use it: How to use it: 2. SFC (System File Checker) What is it?SFC (System File Checker) is a Windows utility that allows users to scan for and restore corrupted system files. It checks the integrity of critical system files and replaces any corrupted or missing files with the correct versions from the Windows installation media. When to use it: How to use it: 3. MDSCHED (Windows Memory Diagnostic) What is it?MDSCHED, or Windows Memory Diagnostic, is a tool built into Windows that helps diagnose problems with your computer’s memory (RAM). It scans your computer’s memory for errors, such as incorrect data or data that cannot be written, and reports any issues found. When to use it: How to use it: 4. DISM (Deployment Image Servicing and Management) What is it?DISM is a command-line tool used to service and repair Windows images. It is particularly useful for repairing the Windows system image, which includes Windows files, settings, and configurations. When to use it: How to use it: 5. NETSH INT IP RESET What is it?NETSH is a command-line scripting utility that allows you to display or modify the network configuration of a computer. The “NETSH INT IP RESET” command resets the TCP/IP stack to its default state, which can help resolve network connectivity issues. When to use it: How to use it: 6. IPCONFIG /FLUSHDNS What is it?IPCONFIG is a command-line utility that displays the current configuration of the IP stack on a networked computer. The “/FLUSHDNS” parameter is used to flush and reset the contents of the DNS resolver cache. When to use it: How to use it: Conclusion: Mastering these essential commands arms you with the tools needed to conquer a variety of computer woes. Whether you’re troubleshooting system errors, network connectivity issues, or reclaiming valuable disk space, these commands are invaluable assets in your tech arsenal. So, the next time you encounter a stubborn computer problem, fear not—empower yourself with these commands and emerge victorious in the digital battlefield.

Read More »