5 Critical Signs You Need to Reinstall Windows for Optimal Performance

Windows operating systems are known for their robustness, but over time, even the most well-maintained system can start to degrade in performance. Whether it’s due to software issues, hardware conflicts, or other problems, there comes a point where a fresh reinstall of Windows is the best solution. In this blog post, we’ll explore the five critical signs that indicate it’s time to reinstall Windows to restore optimal performance. 5 Critical Signs You Need to Reinstall Windows for Optimal Performance 1. Blue Screen of Death (BSOD) The infamous Blue Screen of Death (BSOD) is a clear indication that something is seriously wrong with your Windows system. The BSOD appears when Windows encounters a fatal error that it cannot recover from without a reboot. While occasional BSODs might be caused by a minor driver conflict or software bug, frequent or recurring BSODs signal deeper issues, such as: If you find yourself constantly restarting your computer due to BSODs, it may be time to consider a full reinstall of Windows to wipe out corrupted files and restore system stability. 2. Unexplained Slowdown in Device Performance One of the most frustrating issues for any computer user is a significant slowdown in performance. If your once fast and responsive PC has become sluggish for no apparent reason, a reinstallation of Windows might be necessary. Common symptoms of performance slowdown include: While basic maintenance tasks like clearing temporary files or disabling startup programs can offer short-term relief, a clean reinstall often provides the long-term fix by eliminating old software clutter, orphaned files, and registry issues that drag down your system’s performance. 3. Corrupted System Files When critical Windows system files become corrupted, it can lead to a wide range of problems, including failed updates, application crashes, and erratic behavior. This corruption can occur due to: While some corrupted files can be repaired using Windows’ built-in tools, like System File Checker (SFC) or DISM, persistent corruption is often a sign that it’s time for a fresh start. Reinstalling Windows will replace all damaged system files, ensuring your system runs smoothly again. 4. Infection with Malware and Viruses In today’s digital world, no system is immune to the threat of malware and viruses. Even with solid antivirus protection, some infections can sneak through, severely damaging your system. Signs of a malware infection include: If malware has deeply embedded itself in your operating system, simply running an antivirus scan may not be enough. A full reinstall of Windows is sometimes the only way to completely eradicate the infection and restore a clean environment for your computer. 5. Failed Updates and Frequent Crashes Windows updates are designed to improve performance, enhance security, and fix bugs, but sometimes they can cause more problems than they solve. If your system fails to install updates correctly or crashes frequently after updates, it could be due to: A fresh installation of Windows clears out all these potential problems, ensuring you start with a clean slate and reducing the risk of future crashes and update issues. Conclusion If you’ve encountered any of these critical signs—BSODs, unexplained slowdowns, corrupted files, malware infections, or failed updates—it may be time to reinstall Windows for optimal performance. While reinstalling Windows may seem like a daunting task, the long-term benefits far outweigh the temporary inconvenience. By doing so, you’ll enjoy a faster, more reliable system that functions the way it was meant to. Keeping your system healthy and performing well is essential, and sometimes a complete reset is the best way to achieve that.

Read More »

How to Use Disk Utility on macOS

How to Use Disk Utility on macOS Disk Utility is a versatile tool built into macOS that helps manage and maintain your disks and storage devices. Whether you’re looking to repair a corrupted disk, format an external drive, or simply keep your storage healthy, Disk Utility is your go-to application. In this blog post, we’ll guide you through everything you need to know about Disk Utility, from what it is, to how and when to use it effectively. What is Disk Utility App in Mac? Disk Utility is a native macOS application designed to manage your internal and external drives. It provides a simple, graphical interface for tasks that range from disk formatting and partitioning to repairing disk errors. Essentially, Disk Utility acts as a “Swiss Army knife” for all things related to storage devices on a Mac. The app can be used for various storage-related tasks, including: Whether you’re a casual Mac user or a power user, Disk Utility is a handy tool for keeping your storage system running smoothly. Why You Need Disk Utility App in Mac There are several reasons why Disk Utility is a crucial tool for Mac users: In short, Disk Utility is essential for managing and optimizing your Mac’s storage health. When to Use Disk Utility App in Mac Knowing when to use Disk Utility can save you from unnecessary troubleshooting or even data loss. Here are some scenarios when you should consider using the app: How to Access Disk Utility App in Mac There are multiple ways to access Disk Utility on macOS. Here are the most common methods: Once launched, Disk Utility will display all connected storage devices on the left-hand sidebar, ready for you to manage. How to Use Disk Utility App in Mac Using Disk Utility can seem a bit intimidating at first, but with these simple steps, you’ll find it quite manageable. 1. Running First Aid to Repair Disk Issues 2. Erasing and Formatting a Disk 3. Partitioning a Drive 4. Creating a Disk Image These basic tasks cover most of what you’ll need Disk Utility for in everyday use. Conclusion Disk Utility is a powerful and essential tool for managing your Mac’s storage devices. Whether you need to repair disk errors, format a drive, or partition your storage, Disk Utility has you covered. By understanding when and how to use it, you can maintain your Mac’s health and ensure your data stays safe. Now that you’re familiar with the basics of Disk Utility, you can confidently manage your drives and troubleshoot issues like a pro!

Read More »

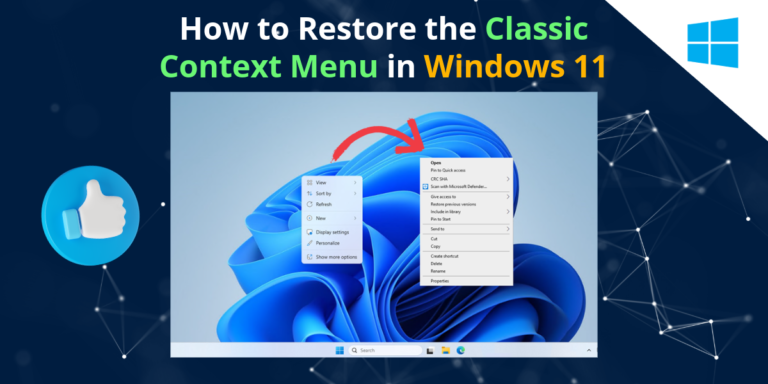
How to Restore the Classic Context Menu in Windows 11: A Step-by-Step Guide

How to Restore the Classic Context Menu in Windows 11 The context menu in Windows 11 has a sleeker and more modern design compared to previous versions. While some users appreciate the change, others find it less functional or slower for certain tasks. If you’re one of those who prefer the old-style context menu from Windows 10 or earlier, this guide will show you how to revert to the classic context menu in Windows 11. Why Restore the Classic Context Menu? Before we dive into the steps, it’s worth understanding why many users prefer the classic context menu: Step-by-Step Guide to Revert to the Classic Context Menu To get back the old context menu, you’ll need to make a small change to the Windows registry. Don’t worry if this sounds complicated – follow the steps below carefully, and you’ll be back to the classic layout in no time. Step 1: Open the Registry Editor Step 2: Navigate to the Correct Registry Path Once the Registry Editor is open, you need to navigate to a specific path: Step 3: Add a New Registry Key Step 4: Create a New Subkey Step 5: Modify the New Subkey Step 6: Restart Your Computer After modifying the registry, you’ll need to restart your computer for the changes to take effect. Once your computer reboots, you should now see the classic context menu when you right-click on your desktop or inside File Explorer. How to Revert Back to the Windows 11 Context Menu If you ever want to go back to the new context menu, simply reverse the changes: Alternative: Using a Third-Party Tool If editing the registry isn’t something you’re comfortable with, there are several third-party tools available that can automate the process for you. Tools like Winaero Tweaker allow you to customize the appearance and behavior of Windows 11, including restoring the classic context menu with just a few clicks. Final Thoughts The updated context menu in Windows 11 may look cleaner, but for those who prioritize functionality and speed, the classic menu can be a better fit. By following the simple steps above, you can quickly revert to the old-style menu and enjoy a more familiar Windows experience. Remember to always back up your registry before making any changes, and if you’re unsure about any steps, consider using third-party tools to simplify the process.

Read More »